(Step-by-Step Guide for a Safe, Easy-to-Install Climbing Wall)
If you’ve been dreaming about adding a rock wall to your playroom, and you thought this is way too complicated and challenging, you’re not alone, and you’re definitely in the right place.
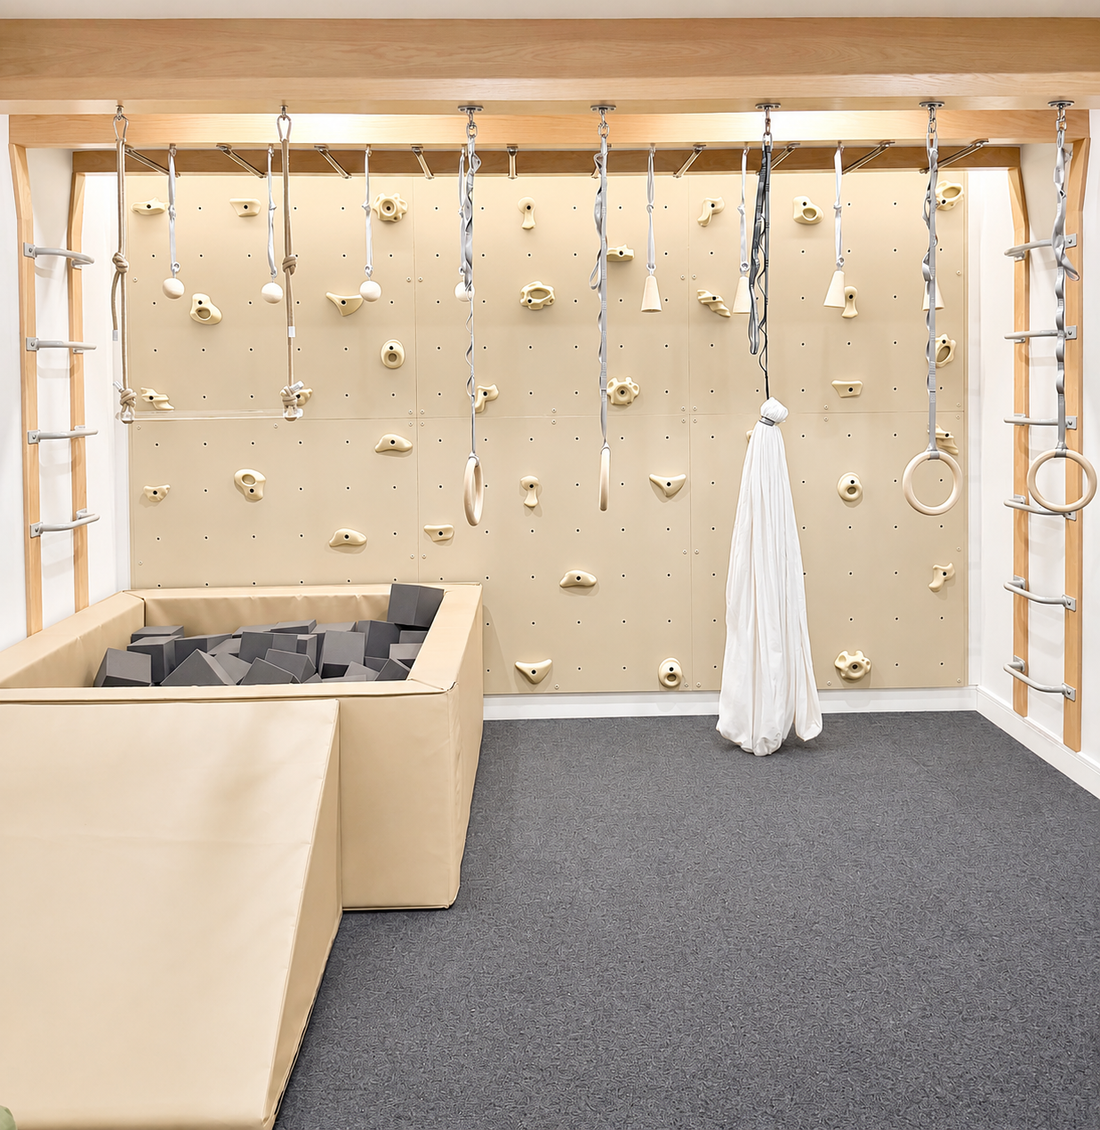
Rock wall panels are one of the best ways to bring movement, confidence-building, and full-body play into your home. But let’s be honest… installation can feel a little intimidating at first.
Good news: it’s actually way more straightforward than you think. With our custom wooden frame that comes with our rock wall panels, anyone can easily install a rock wall in their home.
In this guide, we’re walking you through exactly how to install rock wall panels, from prep with the frame to final holds, so you can build a space that’s not just beautiful, but safe and functional too.
And if you’re more of a visual learner, we’ve included a full installation video HERE to walk you through the process step-by-step.
Why Add a Rock Wall to Your Playroom?
Before we get into the “how,” let’s talk about the “why.”
Rock walls aren’t just cool (although… yes, they are). They’re designed to support:
-
Gross motor development
-
Sensory Input
-
Strength and coordination
-
Confidence and risk play
-
Independent, open-ended movement
-
Balance + Wellness
At Smart Playrooms, we intentionally design our climbing elements to be low-height and developmentally appropriate, so kids can explore movement safely and confidently.
What You’ll Need Before You Start
Before installing your rock wall panels, make sure you have the following:
-
Rock wall panels
-
Rock Wall Frames
-
Mounting hardware (included or specified)
-
Stud finder
-
Level
-
Drill + appropriate drill bits
-
Screws/lag bolts (based on your wall type)
-
Pencil for marking placement
Optional (but recommended):
-
A second set of hands (trust us on this one)
-
Protective mats or flooring underneath

Step 1: Choose the Right Location
Start by selecting a wall that:
-
Is structurally sound
-
Has accessible wooden wall studs
-
Allows for safe clearance around the climbing area
-
Plenty of horizontal length as young kids will want to move horizontally.
Step 2: Locate and Mark Your Studs
This step is non-negotiable.
Use a stud finder to locate the wooden studs behind your wall and mark them clearly. Your rock wall panel frames need to be securely anchored into studs to support the rock wall panels.

Step 3: Position and Level Your Frames
Hold and attach the frames first to the wall and:
-
Align it with your stud markings
-
Use a level to ensure it’s perfectly straight
-
Lightly mark where your mounting points will go
This is where having a second person helps a lot.
Step 4: Secure the Panels to the Frame
Using your drill, attach the panel directly into the frames using the appropriate hardware.
Make sure:
-
All mounting points are tight and secure
-
The panel is centered on the frame.
-
There’s no wobble or movement
Repeat this process for each panel, ensuring alignment between sections.

Step 5: Install the Climbing Holds
Once your panels are mounted, it’s time for the fun part.
Attach your climbing holds using the pre-installed T-nuts on the panel.
You can:
-
Space them evenly for beginners
-
Create more challenging routes as kids grow
-
Mix up shapes and placements for variety
Rotate holds periodically to keep things fresh and engaging.
Step 6: Safety Check (Don’t Skip This)
Before letting anyone climb:
-
Double-check all bolts and screws
-
Make sure panels are fully secure
-
Test holds for stability
-
Confirm flooring underneath is safe (mats or foam pit recommended)
At Smart Playrooms, we always emphasize that risky play should still be safe play, especially when it comes to climbing.

Watch the Full Installation Video
If you want to see exactly how this comes together in real time, check out our full installation video HERE. **Note the frames have already been installed on the walls and the video is showing you how the panels are then are attached to the frames.
This walks you through the full process visually and helps take out any guesswork.
Pro Tips for a Better Setup
A few things we’ve learned from hundreds of installs:
-
Keep climbing features at a comfortable height (confidence > fear)
-
Combine with other elements like monkey bars or swings for a full movement zone
-
Don’t overcomplicate the layout—simple is often better
Final Thoughts
Installing a rock wall + frame is one of the most impactful upgrades you can make to a playroom.
It’s functional. It’s beautiful. It takes up zero floor space. And most importantly, it gives kids a space to move, explore, and build confidence every single day.
And once it’s up? You’ll wonder why you didn’t do it sooner.
Ready to Build Your Own?
Explore our Climbing Essentials HERE
Shop Rock Wall Additions to add HERE.
Or reach out if you want help designing a full playroom setup. We’ve got you.


